#TWORKSHOPS
.jpg)
MARQ WORKSHOPS
Enjoy the experience of history at home with your family and friends
.jpg)

.jpg)
.jpg)
.jpg)
.jpg)
Click on the images to access each workshop.
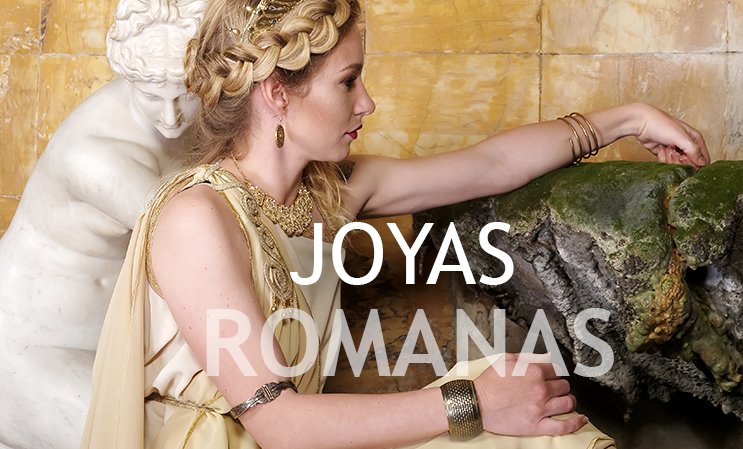
ROMAN CULTURE WORKSHOP
Roman Jewellery
INTRODUCTION TO THE ROMAN NECKLACE AND BRACELET WORKSHOP
Roman women, especially ladies of high social standing, decorated themselves with jewellery and other ornaments. As today, there were many different types of jewellery: earrings, necklaces, rings, bracelets, diadems, brooches, hair pins, etc. The most prized were undoubtedly the pieces made of gold. And perhaps the most eye-catching were the necklaces and bracelets (bracelets) because they were worn on the most visible places, the chest and the forearm.
Would you like to wear your own Roman jewellery? Don't worry if you are a boy, you can always give them to your mother or grandmother.
Roman Jewellery Workshop - Bracelet and Necklace from MARQ Archaeological Museum of Alicante on Vimeo.
MATERIAL ROMAN NECKLACE AND BRACELET
We will need:
- EVA glue, paper, poster board
- Scissors
- Pegamento o fixo
- Amber paper
- Marker pens
- Paper roll carton
Steps:
1. Start with the bracelets, take the cardboard and cut it from top to bottom.
2. We are going to cover it with the material we want, for example I do it with albar paper to give it that metallic touch, although it could also be with a cardboard and paint it in a silver or gold colour.
3. Once it is ready, we start to decorate it, we can make geometric shapes or any other kind of drawing we like.
4. Now we will make the necklace, we will take a sheet of paper and we will make the shape we like, being able to make the central part wider to be able to decorate it more or to make it all equally thin. Once we have it, we will cut it out and see how it would look on us. If the necklace falls off, we will have to lengthen it a bit more.
5. We trace it onto the cardboard once we have the exact size and cut it out. Now that we have it, we can start decorating it as we did with the bracelets.
.........
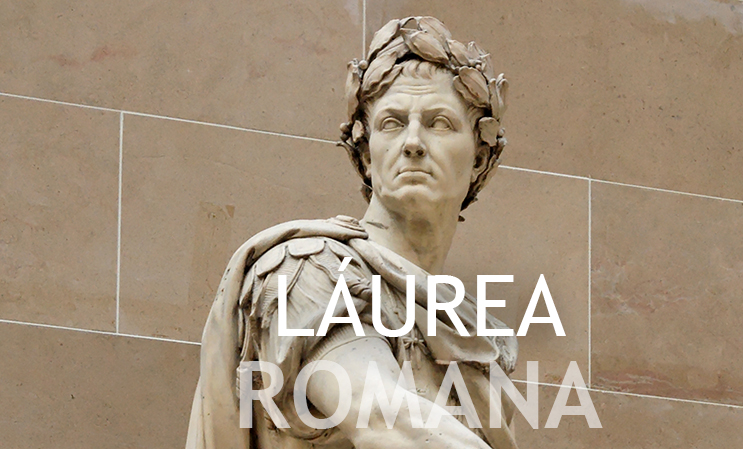
ROMAN CULTURE WORKSHOP
Roman Laurea
INTRODUCTION TO THE ROMAN LAUREA WORKSHOP
The "laurea" is a laurel wreath that was awarded to victorious Roman generals in a war or an important battle. I don't know if you know that at the Olympic Games in ancient Greece, the winners were awarded an olive wreath as a prize. The Romans continued this tradition, but with laurel leaves. If you want to know something curious, the word "laurea" is the origin of the name "Laura". And I'm sure you will also have heard the word "laureate", an adjective used when a person has been awarded or decorated. Now make a laurel wreath and, if you do it very well, put your own wreath on your head, you deserve it!
Laurel Wreath Workshop from MARQ Archaeological Museum of Alicante on Vimeo.
Materials
Laurel leaves or some material, preferably gold-coloured, such as EVA rubber, cardboard, fabric, etc.
-Brush
-Liquid paint, gouache or acrylic type, red and gold
-A headband or wire.
-Satin ribbon
-White tail or similar
-Porex beads or a bracelet or necklace of spherical beads, made of plastic
-Pencil
-Cartulina
-Scissors
Realisation
We will give a first layer of red colour to our bay leaves, this increases the quality of the subsequent browning. But it is not essential.
Normally, if we have spread the paint well, when we have painted the last one, we can continue the work with the first one, as it will have dried.
The painting shall always be on both sides of the sheet, front and back.
When all the leaves are dry, start the browning process.
Apply as many coats of gold on both sides as you think necessary, until the desired shade is achieved.
It is not always possible to achieve the desired shade with a first coat of gold.
While the different layers of paint are drying, we can advance the work and pick up the leaves as we go along.
We will paint the pórex balls, or in their absence those of a necklace or bead bracelet, in gold tone, and we will let them dry.
We will make the frame of our laurea with the wire and ALWAYS with the supervision and help of an adult, or we will use a headband. We will line the frame with the ribbon. If it is yellowish, ochre, golden, etc., the better.
In the case of using a headband, we will also cover it, to make it easier to glue the leaves. If the headband is already lined, this is not necessary.
We will observe the leaves and if they are dry and to our liking, we will start the gluing process.
A lot of patience. LET'S REMEMBER THE IMPORTANCE OF DRYING TIME.
Group the sheets in two blocks, trying to ensure that the sizes of the sheets are well distributed.
Start gluing on the front, that is, on the part of the frame or headband that is open.
At the ends we will glue, two by two, the larger leaves, and we will glue towards the back, which will be the nape of the neck, decreasing in size.
Once they are all glued together, glue the golden balls in bunches of two or three on the leaf joints and some loose ones on top of leaves.
As soon as everything is dry, our laurea will be finished.
NOTE: In case we don't want to use laurel, we have the option of making patterns of leaves with the cardboard and take them to materials such as EVA rubber, golden cardboard, fabrics...
..............
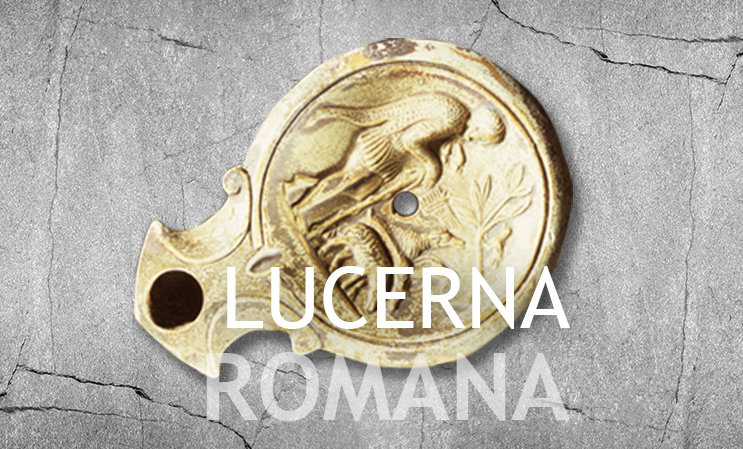
ROMAN CULTURE WORKSHOP
Lucerne Romana
INTRODUCTION ROMAN CULTURE WORKSHOP: LUCERNE
Have you ever thought about how the Romans used to light the inside of their houses? They used little clay lamps called "lucernas". The lanterns could be of different sizes and made of other materials, such as bronze. But they all had a tank to contain the fuel (oil), a channel to hold the wick and a handle to hold and carry it. The lanterns could be decorated with mythological representations, gladiatorial scenes or Christian motifs (such as crosses). Now that you know a little bit more about the lanterns, make one, and be careful not to get burnt!
Laurel Wreath Workshop from MARQ Archaeological Museum of Alicante on Vimeo.
Materials:
-salt paste (1 cup white flour+half cup salt+water mix until dough forms)
-palillo
Procedure:
- Shape the lucerne pastry, place it on the table and press down a little on the
The dough is made into a circle and ends in a point. If you wish, you can reserve some of the dough.
salt dough to make the handles on both sides .
- Use the toothpick to make two holes, one at the tip and one in the middle of the circle.
- Then we will draw a circle and inside it we will make the petals of the flower.
- Leave to dry and our Romanesque skylight is ready.
........
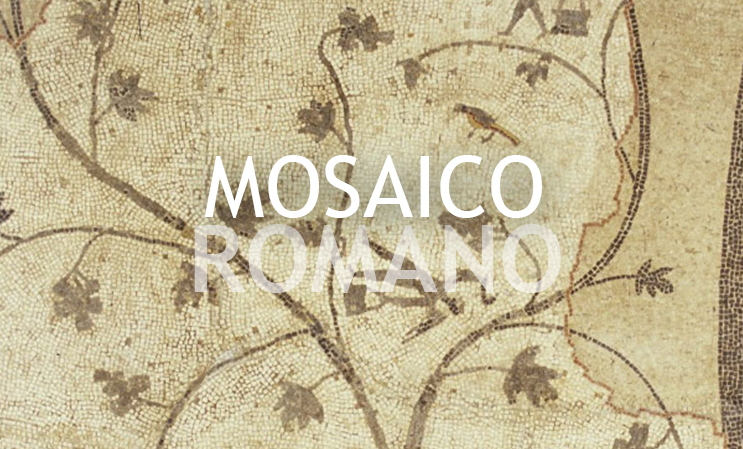
ROMAN CULTURE WORKSHOP
Roman Mosaic
INTRODUCTION WORKSHOP: ROMAN MOSAIC
Do you know what a mosaic is? Mosaic is a decorative work that consists of covering the floor with a pattern made of tiny stone cubes of different colours. Each small piece of stone, about half a centimetre in size, is called a "tesserae". The word "mosaic" derives from the Latin term opus musivumwhich means "work inspired by the Muses". Now that you know this, imitate a Roman mosaic, but with other materials, and... be inspired by the Muses !
Roman Mosaic Workshop from MARQ Archaeological Museum of Alicante on Vimeo.
To make our homemade mosaic we WILL NEED:
Coloured cardboard/magazine clippings/white coloured paper
- Scissors
- Rule
- Pencil
- Glue stick
STEPS to follow:
- The first thing to do is to cut out our tesserae with one of the materials mentioned above.
- We mark out strips about 1 cm wide and cut them.
- Once we have the strips, we cut them into small squares of approximately 1cm .
- On another piece of cardboard, we mark the design of our mosaic with a pencil.
- And once we have drawn our mosaic, we only have to glue tesserae to tesserae with glue stick.
If you have a laminator at home, or plenty of tape, you can laminate it and even make some fun coasters or whatever you can think of!
Enjoy!
..........
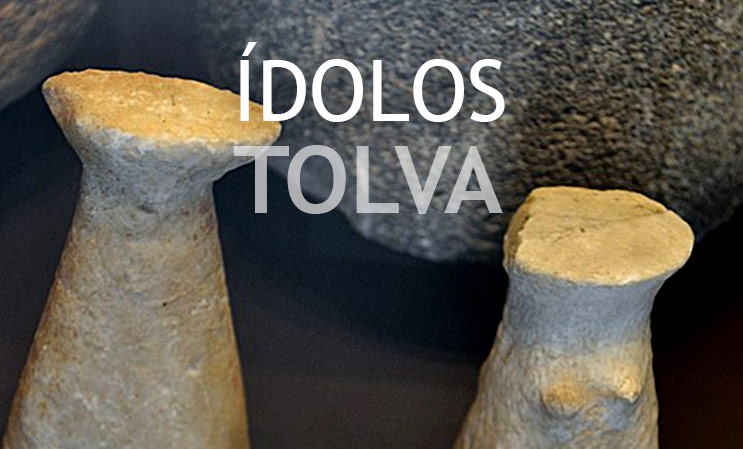
PREHISTORIC WORKSHOP
Tolva Idols
On this occasion we will represent another very common idol in our Prehistory. This is the "hopper idol", a type of idol made of stone or ivory. Its shape is very simple and easy to identify: it has an elongated shape but with a narrowing at the top to indicate the separation of the head and the body. As a result, the lower part of the idol is wider and thicker than the upper part. In some cases, these idols represented women because they were decorated with breasts. So go ahead and get your hopper idol.
idol hopper from MARQ Archaeological Museum of Alicante on Vimeo.
MATERIALS:
1 cup flour
1/2 glass of salt
1 glass of water
1 tupper
1 bowl
1 spoon
STEPS:
1. Take a bowl and add the whole glass of flour. Then add the 1/2 glass of salt and stir everything together to mix it.
2. We start to pour water little by little and move it around. There is no measure for this. We will add more as we see that we still need it.
When you see that it starts to form a ball, then it is ready.
3. Once we have all the ingredients in place, 2 things can happen:
3.1 The dough cracks due to lack of water, so we will add a little more.
3.2 We see that the dough is very soft and doughy, so we add small handfuls of flour.
4. Place the dough in a Tupper with a lid and put it in the fridge for 30 minutes.
5. Once the time has elapsed, we take it out and we can start working it without any problem.
We will use the churro technique, making a round shape and with the 2 flat bases (top and bottom).
6. Make indentations to mark the separation of the head and the body.
7. Once our hopper idol is finished, let it dry for 2-3 days. Keep it in a ventilated place, but do not place it in the sun or in humid places.
* Note: You can add colouring once the dough has been made to give it colour, although we are making a representation imitating ivory, hence the off-white colour.
....
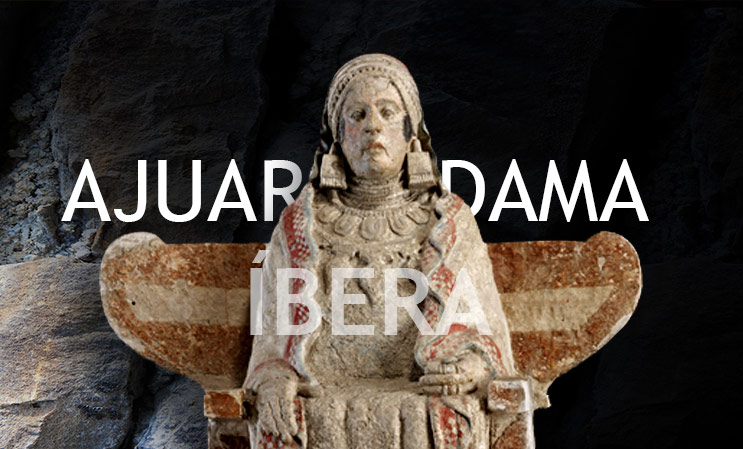
IBERIAN CULTURE WORKSHOP
Trousseau of an Iberian Lady
Do you know what a trousseau is? The grave goods are the personal objects, usually valuables and jewellery, that belong to a person. Archaeologists sometimes use this word to refer to objects found in tombs that belong to the people buried in those tombs. We are going to refer to the personal objects and ornaments that were used in life, for example, those used by a rich Iberian lady. Specifically, we are going to focus on the "rodetes" or circular pieces that adorned the headdress of an Iberian woman. These buns were placed on both sides of the face and probably served to gather and, at the same time, adorn the hair. Perhaps they were made of wood and formed part of the female adornment, along with a diadem and the mantle that covered the head. Do you know of any famous sculpture in which these lateral buns appear? ... In the Dama de Elche! Also in the Dama de Cabezo Lucero (Guardamar de Segura), which is exhibited in the MARQ. Now you can adorn yourself like an Iberian lady did and... who knows? Who knows? Maybe they will confuse you with the Dama de Elche.
LADY IBERA from MARQ Archaeological Museum of Alicante on Vimeo.
Materials:
1. Two circular plastic lids of a container or something similar (cardboard or similar material).
2. semi-rigid)
3. Cardboard
4. Pencil
5. Rule
6. Compass
7. Scissors
8. Wool or string
9. Gold paint (in case you want to paint the bases of the runners).
10. Brush
11. Glue or white glue
12. EVA rubber or some fabric or gold/metalised material
13. Headband
Realisation:
With one of the circular caps, which will be the bases of our impellers, we will draw its circumference twice on the cardboard.
Before starting with the patterns, and once the circumferences have been made, we will paint our semi-rigid bases with the gold paint (this is optional).
Taking the circles made on the cardboard, we will leave one of them circular and, using the compass, we will make another smaller circle in the centre of the other one. With the ruler, we will draw lines from the outside of the small circle to the large circle. This will ensure that, when we cut out our patterns, one will be circular and the other will have a helical shape (helix), by cutting out alternate sections (one every other section), until we get the shape of a gear, so to speak.
If we want to give a little more relief to our buntings, we can use the small circumference, made with the compass, by making it again on cardboard to get a new pattern. This will add volume to the final result.
Once we have the patterns ready, we will draw them on the EVA rubber or the chosen materials. We will cut out our final shapes and save them for assembly.
We will prepare the patterns, on cardboard, of what will be our necklaces, we will cut them out, draw them on the chosen material and cut out the final pieces.
We will start assembling our runners by gluing the circular bases to the EVA circles. Then the helical shape on top and finally the small circle in the centre.
We will glue our buns to both sides of the headband.
We will cut two lengths of wool or cord, one longer than the other, to assemble our necklaces and we will start by gluing the larger pieces on the longer length and the smaller ones on the shorter one.
We can reuse the discarded spiral-shaped tabs from our runners to add as beads to our necklaces.
With this we would have finished our Iberian Lady's trousseau.
NOTE: It is important to respect the drying time of the glue. Otherwise everything will come apart,
....
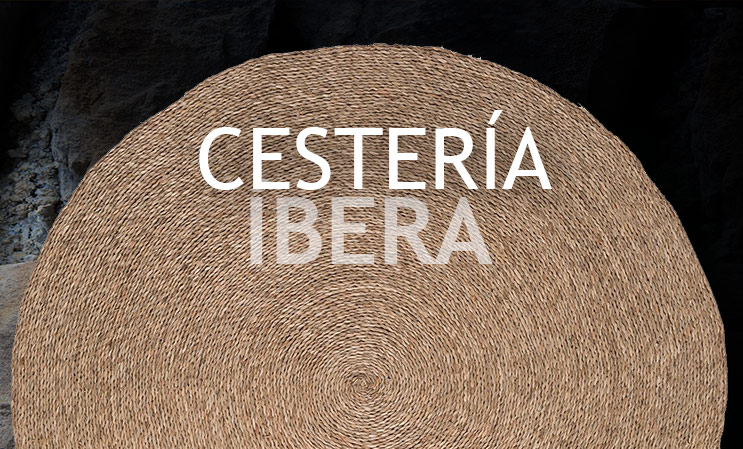
IBERIAN CULTURE WORKSHOP
BASKETRY WORKSHOP
The Iberians were great master craftsmen and craftswomen, and their work included basket weaving. They made all kinds of baskets and other objects such as mats and, possibly, footwear, using only esparto grass. At MARQ you can see the imprints printed on the clay of an esparto mat that decorated the entrance of an Iberian dwelling and the preserved remains (semi-carbonised) of an esparto plait.
In this workshop you will discover how to start making an esparto grass basket (only the base), in the same way as our Iberian ancestors did. But as you know, we will use whatever materials we have at home.
BASKET from MARQ Archaeological Museum of Alicante on Vimeo.
MATERIALS:
1. Some kind of thick rope or string
2. Thread
3. White tail
4. Cardboard
5. Scissors
6. Brush
STEPS:
1. Cut 3 pieces of rope of approximately 1m in length.
2. Tie the 3 strings together at one end with a piece of string.
3. Make a tight braid.
4. When finished, tie the end with another piece of thread.
5. On a piece of cardboard, start gluing with white glue the braid in a spiral (the braid should be glued flat and without gaps, so that at the end there is a circle).
6. Leave to dry.
7. Once dry, cut off the excess cardboard. The end result should be a kind of coaster or plate holder.
Depending on the length of the braid, you can make your "basket bases" in different sizes to give them the use you want.
You can see that braiding is not at all easy... so imagine working with esparto grass!
See you next time friends!
....
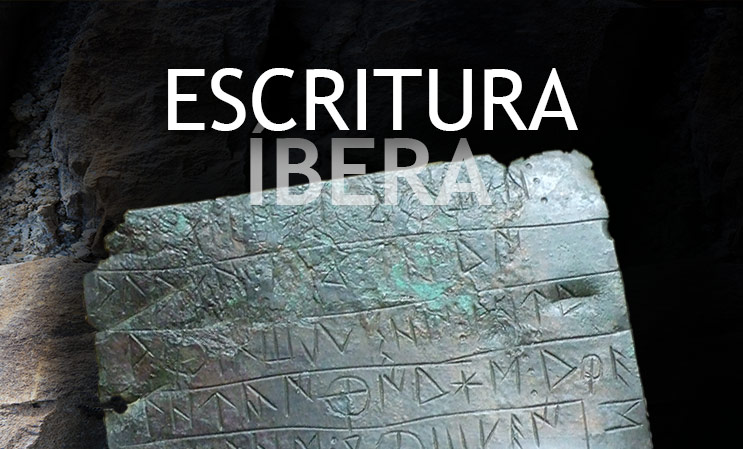
IBERIAN CULTURE WORKSHOP
Writing Workshop
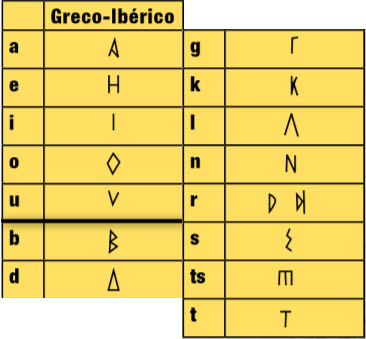
As you know, the Iberians did not invent writing.
They only copied it from the Greeks, who came here to trade. This Iberian alphabet, with some letters copied from the Greeks, is known as "Greco-Iberian" writing. At that time there was no paper, so this writing has only come down to us in the form of brief inscriptions on pieces of pottery (as in La Illeta dels Banyets in Campello) or on lead sheets, such as the examples from La Serreta in Alcoy. These "plomos" had commercial texts written on them, perhaps contracts. Now that you know more, make your own inscription and write the word of your choice, for example, your name or surname. To do this, use this chart.
WRITING from MARQ Archaeological Museum of Alicante on Vimeo.
Materials:
1. 1 cup white flour + half a cup fine salt + water to a salt dough
2. A container in which to mix the ingredients
3. Toothpick
Procedure :
1. Mix the flour, salt and water and knead until a salt dough is formed.
2. Then shape the salt dough into a plate.
3. With the toothpick make the inscription, the name or the whole alphabet.
4. Allow to dry and paint optional.
.....
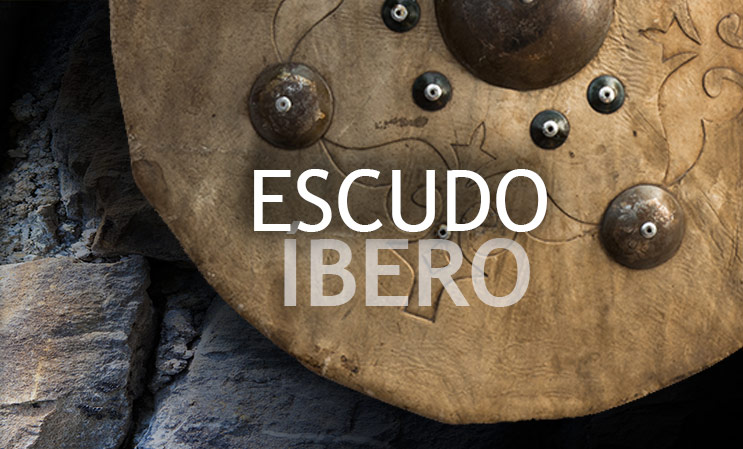
IBERIAN CULTURE WORKSHOP
IBERIAN SHIELD WORKSHOP
Warriors occupied a very important position in Iberian society. You probably already know the most original and characteristic weapon of the Iberians: the falcata. But don't you know what an Iberian warrior's shield looked like, and do you know what it was called? It is called "caetra" and it was round and small. Do you want to have your own caetra? In this workshop you will be able to make an Iberian shield.
shield from MARQ Archaeological Museum of Alicante on Vimeo.
IBERIAN SHIELD MATERIAL
We will need:
1. EVA glue, paper, poster board
2. Scissors
3. Pegamento o fixo
4. Sessile paper
5. Mark marker pens
Steps:
1. Take a frying pan, or something round in shape. On the cardboard, eva rubber, paper, cardboard, etc. we draw the circle in the size we want. Once we have it, we cut it out
2. We will take another type of object to make a second, much smaller sphere. We will make the circle and cut it out again.
3. The second circle that we have made, we cover it with sackcloth paper simulating its silver colour or painting it grey.
4. We will make some kind of decoration to stick around our shield, it can be painted with marker pen or making some figures with eva rubber or foil.
5. On the back of the shield, with a piece of cardboard, foil, etc., we will make the handle, covering it if we wish with a silver colour or painting it to give it a more realistic appearance.
....
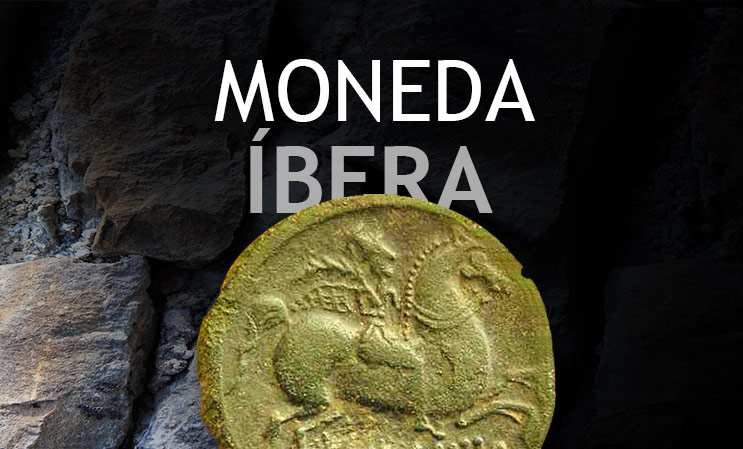
IBERIAN CULTURE WORKSHOP
IBERIAN COIN WORKSHOP
Did you know that the first coins to appear in our lands date back to the Iberian period? They are silver and bronze coins and were brought here by the Greeks and Carthaginians. This means that our first coins came from abroad and that the Iberians copied them because they were used to pay warriors and soldiers. The coin that the Iberians later made depicted, on one side, the figure of a male head and, on the other, a horseman on horseback (usually with a lance), accompanied by the inscription in Iberian script of the name of the city where it was made. Now that you know what they looked like, mint your own coin... and don't forget to write the word Saiti, which is the only Iberian city in our area that made coins.
IBERIAN COIN from MARQ Archaeological Museum of Alicante on Vimeo.
MATERIALS:
1 cup flour
1/2 glass of salt
1 glass of water
1 taper
1 bowl
1 spoon
food colouring, pepper, cinnamon, etc.
Chopsticks
STEPS:
1. Take a bowl and add the whole glass of flour. Then add the 1/2 glass of salt and stir everything together to mix it.
2. We start to pour water little by little and move it around. There is no measure for this. We will add more as we see that we still need it.
When you see that it starts to form a ball, then it is ready.
3. Once we have all the ingredients in place, 2 things can happen:
3.1 The dough cracks due to lack of water, so we put a little more water in the dough.
3.2 We see that the dough is very soft and doughy, so we add small handfuls of flour.
4. Put the dough in a covered taper and put it in the fridge for 30 minutes.
5. Once the time has elapsed, we take it out and we can start working it without any problem.
6. We take a piece of dough, as much as we need to make a coin, it can be the size that everyone wants, it is important to remember that if it is too thin, the coin can break when it dries.
If you like, add some food colouring, pepper, cinnamon or other to give it an antique touch.
7. Flatten the chosen dough and give it a round shape. Once we have it, with a toothpick we will make indentations or marks, making the selected drawing.
8. Once the coins are done, let them dry for 2-3 days and they are ready to start playing with them.
......
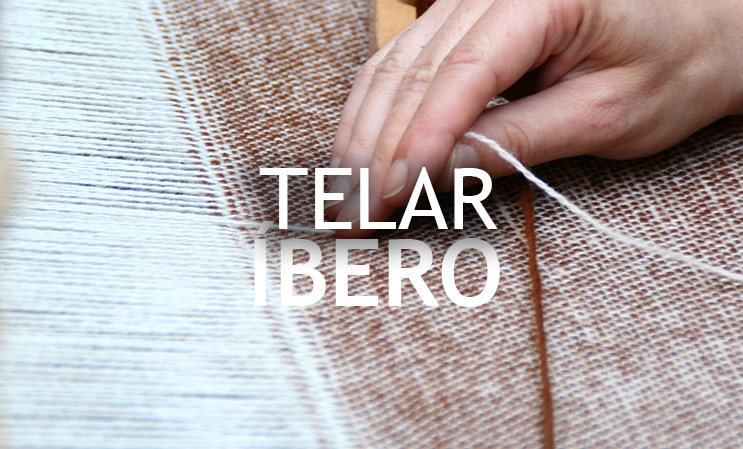
IBERIAN CULTURE WORKSHOP
Iberian loom
INTRODUCTION
The Iberians produced their own clothing. Most of them were made of wool and linen. They used a loom. You know what a loom is, don't you? It is a device made up of wooden strips or cross bars that held the threads stretched in a vertical position. And to keep the threads of the loom very taut, they used clay or stone weights, which sometimes appear in archaeological excavations. Would you like to try to make your own loom? Follow our instructions and you will succeed.
Iberian loom from MARQ Archaeological Museum of Alicante on Vimeo.
For the realization of this workshop we will NEED:
A piece of cardboard (e.g. from a shoebox or cereal box)
String or wool (you can also use rag or cut thin strips from an old t-shirt)
Zeal
Scissors
The STEPS TO BE TAKEN are as follows:
- Cut a rectangle out of cardboard.
- Make cuts of approximately 1 cm on the top and bottom.
- We insert one end of the string into the first cut and tape it to the back so that it does not move. Then we wind the string around the cardboard, passing it cut by cut, so that all the strings are vertical on our cardboard loom.
- To start weaving (from left to right), we leave space at the top and start passing the wool between the ropes: one rope on top, and another rope underneath, and so on.
- When we get to the end and we have to start weaving the next row (from right to left), we must pay attention to the last cord: if the yarn is above it, we must start the next row by passing the yarn under it (and vice versa). The video will help you understand better.
- In this way, we will weave our small tapestry until it reaches the desired size.
- Don't forget to bring each row up so that there are no gaps between the yarns.
- To close the stitches once the tapestry is finished, you will have to cut the strings (top and bottom) carefully and tie them together with two knots: the first with the second, the third with the fourth... and so on.
- To finish, if you have any loose ends of wool left over, you can finish them off at the back of the tapestry (either by intertwining them or gluing them together).
- And finally, if you want, you can add fringes or a rope to hang it on the wall.
I hope you enjoy hand weaving like the Iberians and that you come up with some wonderful creations.
Enjoy!
.....
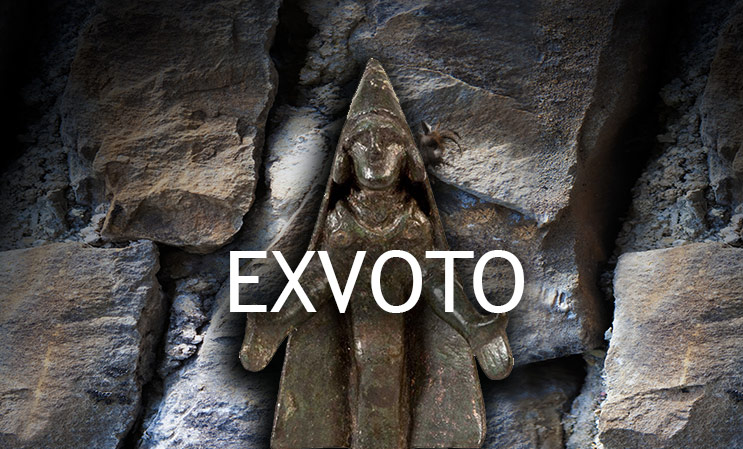
IBERIAN CULTURE WORKSHOP
Iberian votive offering
INTRODUCTION TO THE IBERIAN EX-VOTO WORKSHOP:
The votive offerings were offerings made by the Iberians to their gods to obtain a favour or gift. These offerings could be bronze or clay figurines representing warriors, animals or parts of the body, food or aromatic substances. The votive offerings were deposited in sanctuaries and temples. In our province, votive offerings have been found in the form of clay figurines representing the head of a person with certain physical defects, perhaps made with full intention. Would you like to make a votive offering? Make one that represents the head of a person. Don't worry if you don't get it right, the Iberians didn't get it perfect either, as we said, some figurines have defective features.
iberian votive offerings from MARQ Archaeological Museum of Alicante on Vimeo.
Materials:
- salt dough (1 cup flour + half cup salt + water until dough is formed)
- toothpick
- brush
- white and orange paint to obtain ceramic colour.
- Paint container.
Procedure:
- Divide the salt dough into two balls, a small one to make the ears and eyes.
and the large one to shape our ex-voto.
- Flatten the dough on the table and shape it into a face.
- Press with your fingers to make the holes for the eyes.
- Shape the nose, eyebrows and mouth with your fingers, pressing and shaping little by little.
- Use the toothpick to make the hair.
- Allow to dry.
- Apply the paint.
PREHISTORIC WORKSHOP
Idol Plate
In this workshop we will reproduce a "plate idol" as our Chalcolithic ancestors did. This type of idol was usually made in a type of stone called schist. Their shape was rectangular or slightly irregular, forming a trapezoid, and they were always flat, as the name indicates. Sometimes, the head was to be clearly indicated, and for this purpose the upper end took the form of a triangular or rectangular appendage or projection. The plate idols could have two holes for hanging ... But be careful not to confuse them with eyes, as these were made with incisions on the surface of the plaque. Oh, and don't forget to decorate the plaque with lines or triangles. You can also paint it. Keep in mind that the decoration you make on it would indicate the mantle or garment worn by the idol.
idol badge from MARQ Archaeological Museum of Alicante on Vimeo.
Materials:
- salt dough (1 cup white flour + half cup fine salt + water to form dough)
- toothpick
- black and white paint
- brush
Procedure:
- We flatten our salt dough to make it flat, not too thin.
- With the toothpick we draw the shape of the idol, marking it well and remove the excess.
- Decorate with the toothpick on the idol.
- We let it dry, and once dry we paint it.
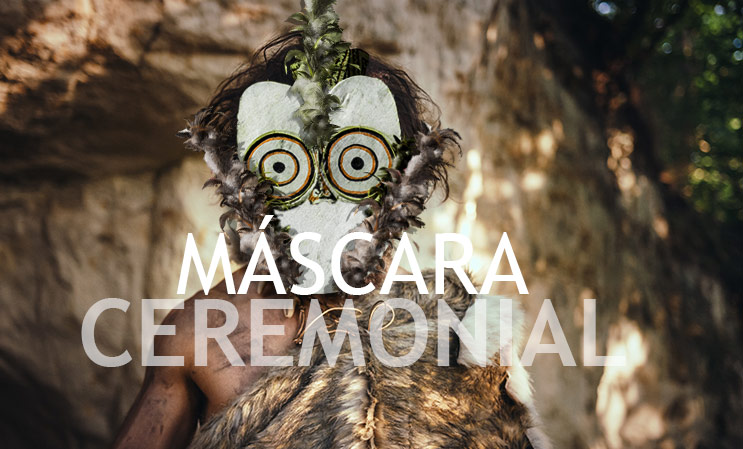
PREHISTORIC WORKSHOP
Ceremonial Mask
Hello friends, it's time to imitate a prehistoric mask. Do you know what a "mask" is? It is a very symbolic object, that is to say, full of mystery, with which the face or head was covered in sacred rituals accompanied by chants and dances. We do not know its exact meaning, but we do know that it was used by shamans, possibly to be successful in hunting, to contact the gods or the ancestors of the tribe, to cure illnesses or to interpret dreams. Who knows? What is certain is that the mask serves to cover the true face and assume another identity, perhaps that of a powerful animal or a supernatural being. We will imitate a mask with the features of a tattooed idol, like those in the MARQ exhibition "Idols. Millenarian Looks". In this way we ourselves will become an "idol" for a few moments.
ceremonial mask from MARQ Archaeological Museum of Alicante on Vimeo.
Materials:
-EVA rubber, cardboard or consistent paper
-Pencil
-Scissors
Gouache or acrylic paint (or, failing that, coloured pencils or felt-tip pens)
-Brush
-Kraft paper or similar
-Hemp thread or other thread or string with a little thickness
-Glue or white glue
-A piece of rubber band (To be able to attach our mask to our head once we are in the
upon completion
Realisation:
We will draw our mask on the EVA rubber or cardboard.
We can use a sketch before drawing the final one.
We will cut it out and draw the facial tattoos.
Radiated suns around the eyes and curved eyebrow lines
and cheekbones.
For facial decoration, we can also use a
pre-design.
Once the facial tattoos have been completed, we will go over the pencil with
liquid paint or, alternatively, with wood paints or
markers.
We will cut strips of kraft paper to simulate esparto grass.
We will braid some of them to decorate the sides and even, if you
we want, to decorate the chin area (chin).
Other strips will be crumpled a little and grouped together to form the
nose. These grouped strips are knotted together with hemp thread or
some similar thread/cord.
We will glue the braided paper on the sides and the grouped with
ties in the nasal area up to the forehead and leaving a plume
outstanding above.
We respect the drying time of the glue.
To finish, we will place the rubber and we will be able to enjoy
our mask.
IBERIAN CULTURE WORKSHOP
Iberian Kalathos
The kalathos or Iberian calatos is a type of ceramic vessel that has the shape of an inverted 'top hat', in other words, it is a cylindrical-shaped ceramic with a wide, flat rim. The shape of this type of ceramic is reminiscent of wicker baskets. Many of the calattas are richly decorated with mythological scenes, sometimes to a high technical standard. Perhaps they were used as ritual vessels for certain ceremonies or social events. Do you dare to make and decorate a kalathos as the Iberians did?
Iberian kalathos from MARQ Archaeological Museum of Alicante on Vimeo.
Materials:
-Cylindrical/tubular container, preferably made of cardboard
-Meter and ruler
-Kraft paper or similar
-Cartulina
-Compass
-Scissors
-Glue/white glue
-Pencil
-Black and red liquid paint (tempera or acrylic) or, failing that, marker pens and/or
wood paints
Realisation:
We will take measurements of our container and mark them on the paper, leaving a centimetre and a half on the length, both at the top and bottom, and at the top on one of the sides. In this way we will make the flaps/tabs to stick to the container.
We will draw the mouth of our container on the cardboard and with the compass we will draw a concentric circle, bigger than a centimetre and a half.
Cut out the circle, inside and out, and glue it to the paper.
With the compass, we will again make concentric circles to the cardboard circle. Both of centimetre and a half. One external and one internal.
We will cut out the strip of paper that will line our container and also the circle, respecting the centimetre and a half of paper that we have left on the outside and on the inside, to create the flaps, as the outer one will line the circle from below and the inner one will be used to join by means of these flaps to the mouth of the container.
Once we have everything ready, we will start to draw the Iberian decoration we have chosen on the paper with the pencil. We will draw it without having glued or joined the pieces together. This is a more comfortable way of working.
Now, once we have drawn our decoration, it is time to glue the strip of paper to the container and the circle to its mouth. Always with the help of the tabs generated.
Once our kalathos has been assembled, it is time to colour it.
If you have liquid paints, add four parts of red to one part of black, and you will get a more suitable maroon colour for the decoration of your piece.
Assuming that we will use only these two colours to decorate.
Black and maroon/red.
Once we have given colour to our decoration, our kalathos is ready.
NOTE: We must respect the drying time of the glue/glue before starting to colour it. Otherwise the piece will come apart.
....
PREHISTORIC WORKSHOP
Hidden Idol
An "idol" is an image in the shape of a human face or body. They are sacred objects created some 5,000 years ago to represent the ancestors or ancestral leaders of the communities that made them. On idols, the most commonly depicted part of the human body was the eyes, to give the object a more human appearance. The eyes were usually depicted in the form of two suns (sun-eyes) and were made on long animal bones, marble cylinders or stone slabs. Do you dare to depict your own hidden idol? Oh... and keep your "eyes" wide open.
Prehistoric idols workshop from MARQ Archaeological Museum of Alicante on Vimeo.
Materials:
salt dough (1 cup white flour + half a cup fine salt + water until dough is formed)
toothpick
Procedure:
Make a cylinder out of the salt dough.
Decorate with the toothpick making the soliform eyes, the facial tattoos and the hair.
Leave to dry
......
PREHISTORIC WORKSHOP
A very prehistoric pencil holder
The cylindrical occultic idols were made of stone or bone and were objects with a sacred character, possibly representing the ancestors of the Neolithic and Chalcolithic communities.
The face appears on idols with a large size to indicate that it is very important. The most important part of the face is the eyes. The eyes are represented as two large suns (sun-eyes). Next to the eyes there are sometimes curved lines indicating eyebrows or tattoo marks. The nose is rarely indicated.
For us it can also be a very important element because we can store our study "tools" in them.
video pencil holder from MARQ Archaeological Museum of Alicante on Vimeo.
For the realization of this workshop we will NEED:
3 rolls of toilet paper
paper towels
water
white glue
paints (tempera, watercolours, crayons...)
markers
piece of rope or string
brush
scissors
double-sided tape
The STEPS TO BE TAKEN are as follows:
Prepare the mixture of water and white glue (equal parts).
We cut with scissors two of the rolls to different heights.
We line the toilet paper rolls by sticking pieces of kitchen roll with the glue and water mixture with the help of a paintbrush.
Leave to dry.
Once ready, paint them off-white, beige, or simply white with a touch of yellow.
Leave to dry.
Now it's time to give each of our "idols" their characteristic "sun-eyes" and facial make-up. We can do it either with a felt-tip pen or with a brush.
Finally, we will join our three "idols" together with double-sided tape.
To reinforce the union, and to give it a decorative touch, we tie a piece of string around it.
And now we would have our prehistoric pencil holder ready to organise our paintings.
I hope you like it!
..................
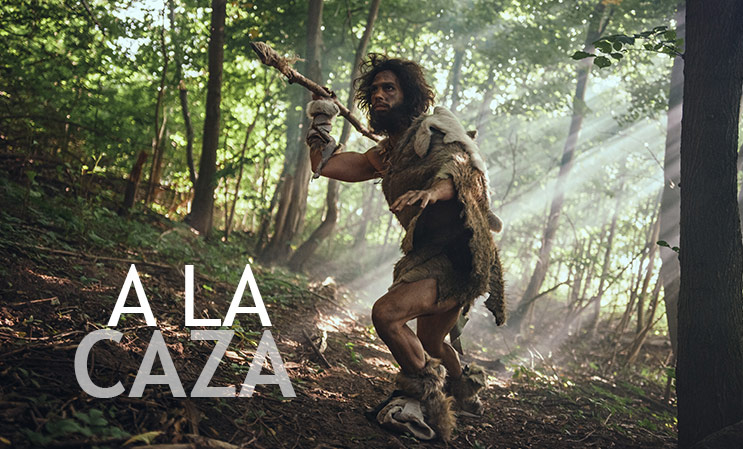
PREHISTORIC WORKSHOP
On the hunt!
INTRODUCTION:
In prehistoric times they made tools for hunting. They used to shape flint edges by means of blows. These tools were used to work wood to make pointed spears with which they shot their prey. Over time, spears were made of wood and bone and were armed with spearheads and lithic points. With the advent of metals, arrowheads were also made for hunting.
The tips of spears and arrows were tied to the wooden shaft with the help of "ropes" made from the sinews of hunted animals. It is possible that a notch was made in the end of the shaft to insert the back of the flint point a little and then it was tied, wrapping the rope around it. This can be clearly seen in the case of arrowheads, which usually had a "peduncle" that went into the wood of the shaft.
on the hunt from MARQ Archaeological Museum of Alicante on Vimeo.
PREHISTORIC SPEAR MATERIALS
We will need:
EVA glue, paper, poster board
Scissors
Pegamento o fixo
Marker pens
Wool, string, yarn, albumen paper, etc.
Straw if desired
Steps:
1. We take a piece of paper, cardboard, eva rubber, etc. and cut a piece. If, for example, we use brown cardboard, it will give us the effect of wood. If we don't have it, we will use some coloured pencils or felt-tip pens and we will paint it trying to simulate that it is wood.
2. We will make a churro and glue it. You can use fixo along the whole length of the piece to reinforce it.
3. We will make the tip of the spear in the way we like the most, we can even make several to interchange them as we like. To do this, we will draw the stone on the cardboard or eva rubber and cut it out, making another one just like it to stick to the shaft on both sides.
In the old days, the shaft and the stone point were joined together with the sinews of the animals, as they were used for everything. In order to imitate this procedure, we can use wool, rope, sisal paper or other resources.
4. Then we can make some kind of decoration. In the old days, you could carve and decorate the part of the pole. When using another type of material, either cardboard or eva rubber, what we will do is cut out other pieces of cardboard or some leftovers we have at home, either from painted cardboard or another type of material, and on them we will make the decorations we like the most.
..................
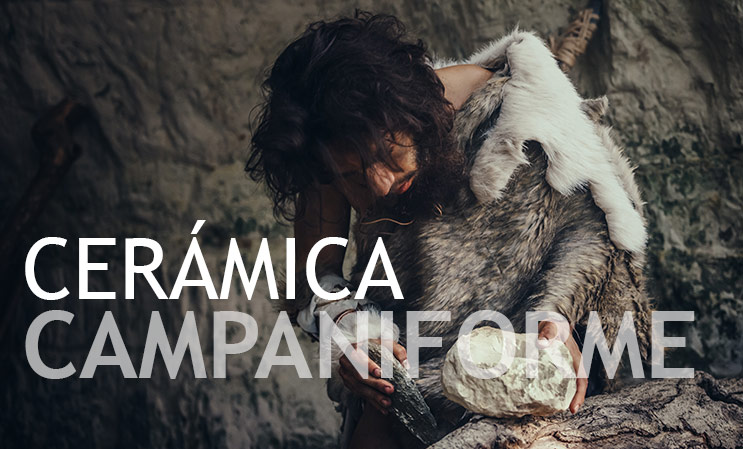
PREHISTORIC WORKSHOP:
MY CAMPANIFORM POTTERY
INTRODUCTION:
The first signs of copper metallurgy in the lands of Alicante are associated with a special type of pottery characteristic of Western Europe known as Campaniform.
This pottery is bell-shaped with a characteristic decoration based on impressed or incised motifs, in which horizontal bands and triangles predominate. They are found in settlements on the plain, in new settlements on hilltops and in burial caves.
All these pieces are linked to a period which, taking the name Campaniform (2500-2300 BC), heralds the characteristics of the Bronze Age.
Campaniform pottery workshop from MARQ Archaeological Museum of Alicante on Vimeo.
Materials:
-Clay or, failing that, modelling clay
-Tools/elements with sharp points:
Punches, skewers, chopsticks, chisels, pencils, pens, etc.
Realisation:
Once we have the block of clay or plasticine, we will start working according to the size of the material we have available.
Step 1: We take a piece and make a ball/sphere that we will then flatten on a surface, giving it a thickness of a hamburger more or less. This will be our base.
Step 2: We will make churros/cylinders about the thickness of a finger. Or a little more, if we have enough material.
Step 3: Place three or four cylinders on the doughnut-shaped base. Always on top and not around
Step 4: Now we will have to attach them to each other and to the base. This process is called "stitching". With the tip of your thumb or index finger, and very carefully, we will sew the clay/plastiline from top to bottom to create uniform walls. Repeat the process also on the inside and widen the cavity of our bowl, always stroking with the fingertips, pressing slightly outwards and never pinching with our thumb and forefinger.
Step 5: Now it's time to decorate with the tools at our disposal. Always under the supervision of an adult. We will make a geometric decoration by incision and without pressing, as the material to be decorated is soft and would be easily pierced and/or damaged.
And with this we would have our bell-shaped bowl ready.
NOTE: If clay is used, leave to dry for sufficient time in a ventilated place in semi-shade. Never in direct sunlight.
..........
PREHISTORIC WORKSHOP:
MY SUNNY CERAMICS
.jpg)
The Neolithic period saw the appearance of pottery, with a wide variety of vessels for cooking food and for holding water or grain.
Prehistoric art is divided into two types, rock art on cave walls or on rocks in the open air, and movable art, which is made on objects that can be transported.
We found schematic motifs, specifically "soliforms" (radiating suns) on the cardial pottery from the Cova de lÓr. Other ceramic fragments with zoomorphic motifs (goats and deer) represented on Neolithic pottery were also found at this site.
sunny ceramics from MARQ Archaeological Museum of Alicante on Vimeo.
Materials:
Paper
Pencil
Markers or coloured pencils
Scissors
Fixo or glue (depending on the material of the bowl)
Plastic bowl (tupperware type) or ceramic bowl (always under supervision)
Realisation:
Step 1: We will take the measurements of the paper to line the bowl.
Step 2: make flaps (horizontally at the top and bottom) to fit the bowl and glue inside and at the base.
Step 3: Once lined we will make the decoration with pencil to be able to correct it.
Remember that the decoration, in this case, will be with soliform motifs (circles with perpendicular lines in the form of sun rays) and zoomorphic motifs (goats and deer).
Step 4: When the decoration is to your liking, go over it with felt-tip pens or coloured pencils.
And now our bowl with soliform and zoomorphic decoration is ready.
........
PREHISTORIC WORKSHOP:
Painting my cave
Rock art is found everywhere in the world, it is universal. It reflects the beliefs and concerns of human populations over thousands of years.
Some rock art sites are so important that they are included in the UNESCO "World Heritage" list.
Rock art is made on cave walls or on rocks in the open air.
In the province of Alicante we have four styles or types of prehistoric art: Palaeolithic art, macro-schematic art, Levantine art and schematic art.
A real archaeological heritage that deserves to be known and protected.
Cave painting workshop from MARQ Archaeological Museum of Alicante on Vimeo.
Materials:
1 mixing bowl:
- 1 cup flour,
- half a cup of salt
- 1 cup of water
1lapicero
1brush
red paint, acrylic paint or tempera paints
Procedure:
Step 1: place the cup of flour and half a cup of salt in the bowl and add water little by little until you have the right dough to work with. If the dough is too liquid, just add a little more flour and salt.
Step 2: Shape the dough into a rectangular plate. If it sticks, you can sprinkle a little flour on your hands.
Step 3: with the pencil we start to draw on the plate making a little pressure so that our cave paintings are marked, you can make a sketch of the drawing before.
Step 4: paint with red acrylic paint or tempera the drawing we have made, going over the pencil line with the brush. Finally let it dry and our cave painting will be ready on our little piece of cave.
-------------------------
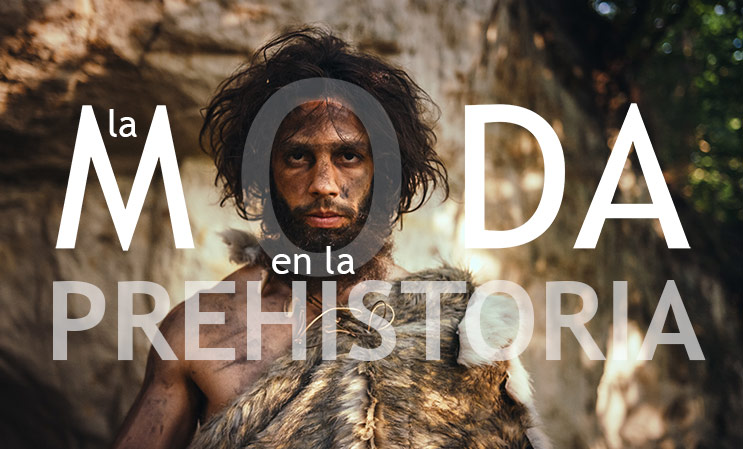
PREHISTORIC WORKSHOP
Fashion in prehistory
In prehistoric times they made their own clothes from the skins of hunted animals (deer, goats, bison, etc.). The skin of the hunted animal cannot be used as it is obtained, it must be cleaned well removing the remains of tissue and fat. To do this, a type of lithic tool would be used ("raspadores" and "raederas"). It would then be left to dry, possibly over a fire. Archaeology has brought to light bone needles that would have been used to sew these parts together. The "thread" used would have been thin strips of animal sinew.
The ornaments that have survived from the early Neolithic period are perforated shells, rings obtained by the technique of grooving long bones and stone anklets or bracelets, plain, decorated or made up of two perforated pieces joined together by means of fibres.
Prehistory workshop 1 from MARQ Archaeological Museum of Alicante on Vimeo.
MATERIALS:
- Rubbish bag
- EVA glue, cardboard, foil, etc.
- Scissors
- Piece of string, ribbon, shoelaces, etc.
STEPS TO MAKE OUR PREHISTORIC CLOTHING
1. We take the rubbish bag and cut off the ends so that we can take out the arms. Do the same in the centre of the bag to be able to take out the head from the top. It should look like a sack. You can also decorate the bottom, making spikes.
2. We take cardboard, eva rubber, paper, or any other material we have at home to decorate the dress and make it look like the skin of one of the animals that hunted in prehistoric times. If we don't have any of these materials, we can take the cartons from milk packets or cereal boxes and cut them out.
3. Once we have the dress, we are going to make some decorations: we will cut some cockle shells to make a necklace and then we will make some small holes in the area that joins the two shells and we will pass the string through there.
4. We can make a hair ornament, so we will take a piece of cardboard and paint it white to simulate a bone.
Let's see what you look like!
Send your photos to our social networks
-------------------------